
DODGE VIPER
SRT-10 Header Plate
PART #
ACC-973008
INSTALLATION INSTRUCTIONS
NOTE: Your new covers come to you with a clear protective liner. Do not remove liner installation is complete.
PARTS INCLUDED:
1 - Stainless Header Plate; 4 - 2” Furry Disks; 2 - Smaller Disk Sets
Your new cover comes to you with a protective liner. Remove liner when prompted by instructions.
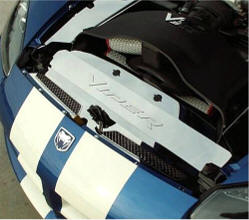
This unique accessory is truly a nice addition to the viper engine bay. A very simple part to install that will transform the large void in front of the radiator to a beautiful grilled area adding a classy and custom look to what would other wise be a dull empty spot in the engine bay.
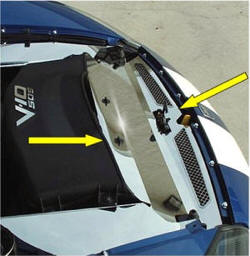
- In order to install the header plate you will need to prepare the area to receive the header plate by first removing the black plastic seal from the top of the radiator. This seal is a flexible rubber gasket that can easily be removed by simply pulling up on one end to unsnap the seal from the radiator and continue lifting until it is completely detached from the radiator. NOTE: This seal will no longer be necessary and will not be reused.
- Remove the two black plastic thumb screws from the air filter snorkel just in front of the filter housing.
- Depending on your particular vehicle there may be a very small black plastic composite rectangular tab casting perturbing up from the top of the driver side end of the radiator. This very small tab represents a tiny bit of clearance needed for the new header plate to rest level and fit between the plate and hood. If your car has this tab it will need to be snipped off and can easily be done using a common pair of wire cutters.
- You have been supplied with four 2’’furry disks. Place these disks directly to the area just under the hood vent openings. Place them at the two outer ends of each or the two hood vent openings. This will protect the hood as well as the new header plate from any possible contact. You have been provided with two smaller disk sets to be applied directly to the header plate just in front of the snorkel notches just after installation.
- Now that all preparations have been performed you can now install the header plate. Place a length of masking tape along the edge of the cars nose flange just in front of the hood catch to protect the paint. Begin by setting the two large tabs of the header plate into the air filter snorkel as you set the front section over the hood catch mechanism. This will take a little maneuvering to place the plate over the hood catch without forcing the plate. Once you have maneuvered the plate over the catch carefully manipulate the front of the header plate past the cars nose flange so that you don’t scratch the painted edge. Once you have past the nose flange your new header should be resting nicely onto the hood catch support rail and can now be secured by reinstalling the two plastic thumb screws. Be careful not to over tighten the screws as this will tend to distort the panel. Just snug will work just fine. At this point you will want to look at the overall fit to determine that the panel is fitting nice and flush. Test this by pushing the panel in several areas to make sure it is resting perfectly flush with the radiator/catch rail and air filter snorkel. Because every car always have small differences between them minor adjustment in the fitment may be necessary. These adjustments can easily be achieved by first identifying them and then removing the panel and pressing the shape by hand accordingly.
- Now that you have successfully fitted and installed the header plate remove the protective liner from the face of the header plate. You will need to loosen the two thumb screws to release the liner at these areas and then re snug them.
-
The final thing to do is to apply the
two small furry disks. NOTE: There are two small areas of possible
contact between the hood and the header and that is just in front of
the panels notches provided for the snorkel. In order to determine
just where to mount the furry side of the Velcro disks simply
remove the release liner from both halves of each of the disks and
place the hook side of the two disks directly to the hood outside
corners of the hood vent openings. With the two halves connected to
each other and tacked to the hood simply lower the hood and gently
press the hood closed so that the disks will make contact with the
header plate thusly attaching itself to the header determining an
accurate positioning the disk to the header plate. Open the hood.
The furry half of the Velcro disk should remain in place on the
header. Press firmly to set. Remove the hook side of the disk from
the hood to finish the installation.
If any questions occur during
installation please contact American Car Craft @ 727 861-1500.
Note: Care must be taken when cleaning your cover. It is a good idea to lightly dust your cover with a clean soft cloth first in order to prevent any particles from scratching it. Then wipe (using a new clean soft cloth) with a good quality streak free glass cleaner. SEE ENCLOSED CARE SHEET!
TheViperStore.com a
HotCarAccessories.com website