
06
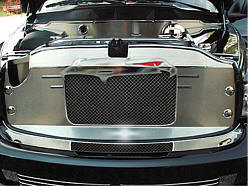
DODGE RAM SRT10
FRONT GRILLE
FASCIA
PART #
DSGF501
patent pending
INSTALLATION INSTRUCTIONS
Parts Included:
Stainless Grille Fascia
1 x Black 1 ½’’x 25 ½’’Aluminum Replacement Bracket
2 x 1 ½’’Black Washer Head Screws
1 x Notched Stainless Steel Panel Insert
1 x Adhesive Promoter Pack
1 x 4’’Self Stick Furry Pad
4 x 2’’Stainless Decorative Caps
Your new stainless grille fascia is a unique and awesome looking up grade to your SRT 10 truck. In order to enjoy this new grille you will need to reposition the A/C condenser using a replacement bracket provided as well as some minor modifications to a single area on the underside of the hood and two locations at the headlight mounting brackets for the 2006 models
IMPORTANT: PLEASE READ COMPLETE INSTRUCTIONS BEFORE BEGINNING INSTALLATION!
Your new panel comes to you with a protective liner. Do not remove liner until installation is complete.
- Remove the four bolts securing both headlights to the radiator support frame. You will notice a small sensor under one of these bolts on the drivers’ side headlight. This sensor must be repositioned so that it rests to the side and just behind the headlight bracket. This can be done by simply flipping the sensor over and inserting it just behind the headlight bracket. On the 2006 models you will notice a small tongue at the top of the headlight brackets. This tongue will need to be shaved flush to the bracket in order to accept the new fascia. This can easily be done using a common shop cut off wheel.
- Remove the top two A/C condenser brackets. NOTE: these will not be reused. You will notice three small black screws to the bottom left and right condenser brackets. Remove these screws and allow the condenser to slide down to the next set of holes in the condenser core and reattach. You have been provided with an aluminum replacement bracket this bracket is to be mounted under the two top radiator bolts just behind the A/C condenser. Remove these two bolts and position the aluminum bracket so that its offset holes are facing up and attach the bracket by reinstalling the bolts. You will notice that there are small preexisting holes at the top of the condenser core. Pilot a 9/64th drill thru these top holes on both sides of the condenser core being ESPECIALLY CAREFUL NOT TO DAMAGE the core itself. These holes should line up just between the core tubes and not threaten the core. Pilot the drill thru the core holes into the aluminum bracket then fasten using the two black washer head screws provided.
- You have been provided with a small rectangular stainless steel panel which contains a notch. This panel has been supplied to be placed directly to the radiator support pillar just behind the passenger side headlight and will act as an air deflector for the ram air port built into the new grille fascia. To install simply wipe the pillar clean of dirt with household rubbing alcohol then swipe once with the adhesive promoter pack provided. Place the small panel so that the notch sits over the support gusset at the base of the pillar and make note of its position. It will be necessary to nudge the aluminum A/C line back a little to allow this panel to have full contact with the pillar. Once you can see just how it is to be installed simply pull the red release liner from the back of the panel and press it into position.
- HOOD PREPARATION: Remove the black ABS fascia from the back of the hoods grille. It is fastened with push in type retainers and can easily be separated from the grille. NOTE: This black fascia is no longer needed and will not be reused.
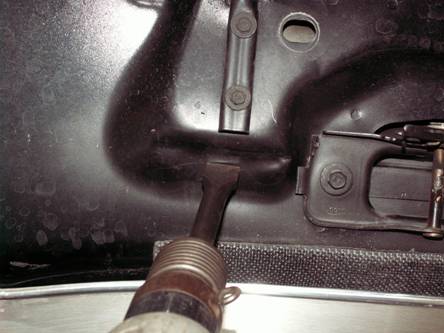
- You will notice a tubular grille support bracket mounted behind the grille directly to the center area of the hoods under frame just to the left of the hood catch. As you examine this location you will notice a significant bulge directly in back of this tubular bracket. This bulge is formed of a stretched and very thin metal. In order to create adequate clearance for the new fascia this bulge must be reversed in its shape to more of a right angle indent, much like the right side of the hood catch plate. We have provided pictures of just where and how to reverse this shape. See picture #1. (Please refer to the pictures at the end of these instructions to perform this task.) Using an air chisel and or a blunt hand chisel, position the chisel at the center of the bulge and hammer the area until it puckers into a right angle ridge running horizontally along the entire back of the bulge. You will find that the metal there is relatively soft and will conform to your customizing very easily. Once this step is complete it should look like picture #2. After you have successfully completed this step seal the modified area with the self stick furry pad provided. If done correctly there will be no need to repaint this area the pad will provided adequate insulation between the hood and the new fascia.
- The last thing you will need to do is to alter the safety catch hook as well as the safety catch release handle. In some situations the safety catch release handle may sit lower then the bottom of the hood grille. This can easily be remedied by adjusting the wire rod attached to the catch assembly upward until the handle part of the rod no longer is lower then the bottom of the hood. Finally the hoods safety catch is manufactured as a relatively long straight down part. In order to prevent the bottom of the hook from denting the new fascia you will need to slightly bend the tip off the hook towards the grille. This can easily be done by clamping the very bottom of the hook only with a vise grip pliers and force the tip forward. After this step is completed lower the hood to check that the catch works properly and that you have maximum pitch. In some situations it may be necessary to cut the very tip of the hook back about a 1/4 “to achieve maximum clearance. This can be done using a cut off wheel or a jigsaw with a metal cutting blade.
- After all modifications have been performed properly, you can now begin installing your new fascia. Since the new grille fascia is a wide open part you may want to spray some flat black paint to all the raw aluminum parts in the radiator area. This will give the grille fascia the best looking results and is highly recommended. Carefully place the new fascia into position over the headlight bolt holes exposed earlier. Be especially careful not to scratch the paint during placement. (The use of a friend may be helpful). Loosely place all four headlight bolts into their holes and fasten by hand. Adjust the fascia so that the unit lines up to the very top of the radiator support without going over it! Tighten the bolts securely once this alignment has been made to each side.
- You have been provided with four round stainless steel decorative bolt covers. These covers can easily be installed by adhering them in place using 100% household clear silicone. Simply place a large dab to the center of each cover and tape them into position using a 2” masking tape. Allow a couple of hours to set.
If any questions occur during installation please call American Car Craft at 727 861-1500.
CARE AND MAINTENANCE:
Note: Care must be
taken when cleaning your cover. It is a good idea to lightly dust your
cover with a clean soft cloth first in order to prevent any particles
from scratching it. Then wipe (using a new clean soft cloth) with a good
quality streak free glass cleaner.
PICTURE #1

PICTURE #2
14
copyright
TheViperStore.com is a HotCarAccessories site