![]()
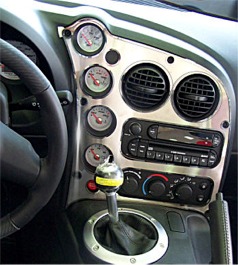
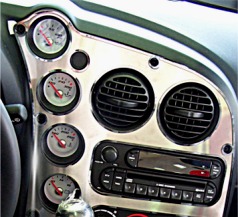
Dodge Viper SRT10
Stainless Steel
Dash Control Panel Overlay
PART ACC-971009
INSTALLATION INSTRUCTIONS
Included: 1 x Dash Control Panel Overlay, 1 x packet of Adhesive Promoter, 1 x Tape Test Kit
NOTE:
We recommend that if possible a professional trim, body and paint person
install this part.
VERY
IMPORTANT! Read all the directions before starting! Once the
rear liner has been removed the part is no longer returnable.
First, in order to Allow Adhesion - you must first prepare your Dash
area where the piece is going to be installed. You can do this by
scrubbing the entire area first with household isopropyl alcohol. This
will remove all the built up oils from finger prints, cleaners, shining
products, ect.
NOTE:
If this area is not prepared exactly as described above using isopropyl
alcohol installation will NOT work.
We are sorry but we can not be responsible for kits not sticking do to
improper preparation!
NOTE:
Do not take the red backing off your Dash Control Panel Overlay before
instructed to do so in the instructions. Do not take the clear
protective cover off the front of this product until instructed to do
so.
-
Scrub your
entire are to be mounted first with soap and water, dry the area.
Next clean the entire area thoroughly with household
Isopropyl Alcohol found at any hardware store. Be sure to
get right up to the edges of all gages and bolt holes.
Once complete wipe off all residues.
-
Now take the piece
of test tape included (if not included you may use a piece of
masking tape) to test the surface to accept tape. Try sticking the
test piece of tape to various spots on the surfaces where you are
going to mount your new part. The tape should stick readily to
each place you stick it. If it does not then re-clean the
surface until it does.
-
Now you want to
work with your Dash Plate to test the fit. Without removing
the red rear liner - Place the Dash Control
Panel Overlay up to the area where it is to be mounted. Slide around
until you are comfortable how it fits. You will only get one shot at
this – so you don’t want to make a mistake.
Your new trim plate comes to you pre-cut, however it will be necessary to further shape (bend) it by hand in order to achieve a perfect fit without forcing it. You will have to do this by trial and error. Slightly bend to follow the contours of the Dash by hand or using your leg as support. Once you are satisfied that the trim piece is the exact shape of the surface of your car you are mounting it to - move on to Step 3.
-
Swipe the area
where where you will be mounting the trim to with the
adhesive promoter (packet provided). Be sure to carefully apply closely
around any openings and all gage and bolt holes. Be sure to
thoroughly cover all corners. Let dry for 5 minutes
-
Peel red liner
from the backside. Slowly and carefully position the Dash
Control Panel Overlay into place just above the dash without
mounting it yet. Carefully line up so that all four corners are
lined up. Once it is perfectly in place lightly set the panel
onto the dash. Make any last small adjustments. Now
firmly press from the center out along the entire surface for a good
bond.
NOTE: YOU ONLY HAVE ONE SHOT AT THE FINAL PLACEMENT so you may want to make a couple dry runs before actually mounting the trim plate.
Once you stick it on - it is permanent6. Once you have successfully mounted it into position, press firmly over the entire plate to set. Take masking tape and tape up the outer edges of the entire Dash Control Panel Overlay. This will firmly hold it in place until the adhesive is set. Allow to set this way for at least 8 hours. DO NOT GET WET FOR 24 HOURS.
7. After this time period is over peel off all the masking tape. Peel off the clear protective liner on the front of the Dash Plate. Clean off all adhesive residues from tape.
If any questions
occur during installation please contact us at:
admin@TheViperStore.com
CARE AND MAINTENANCE:
Note:
Care must be taken when cleaning your cover. It is a good idea to
lightly dust your cover with a clean soft cloth first in order to
prevent any particles from scratching it.
Then wipe (using a new clean soft cloth) with a good quality streak free
glass cleaner.
2006-2013 copyright
TheViperStore.com is a HotCarAccessories site