
DODGE VIPER SRT10 Door Panel Inserts©
Polished or Brushed Finish
Part # ACC-971004 & ACC-971005
INSTALLATION
INSTRUCTIONS
Parts Included: 2
x Brushed Door Guards,
2 x Tape Test Strips, 1 x Abrasive Pad, 2 x Adhesive Promoter Packets.
Your Door Guards come with a protective liner. Do
Not Remove until the part is fully installed.
VERY IMPORTANT - PLEASE READ
ALL INSTRUCTIONS BEFORE BEGINNING YOUR INSTALLATION! YOU MUST FOLLOW
THESE INSTRUCTIONS EXACTLY OR YOUR NEW PANELS MAY NOT ADHERE.
1.
BEFORE YOU BEGIN YOU MUST FIRST PREP THE DOOR PANEL IN ORDER TO ALLOW
ADHESION. You can do this by scrubbing the entire area first with
household Isopropyl Alcohol found at most grocery stores and all
hardware stores. Then closely follow the procedures outlined in the
following steps.
2. If
your door panels have been treated with armor-all or silicone
coatings (even years ago), installation will NOT work unless these treatments have been
REMOVED with special chemicals! Household Isopropyl alcohol alone will
NOT always be enough to remove it.
NOTE: Some doors have been treated at the dealerships and the
factory before you purchased the car. So to be extra safe we suggest
that you please refer to the SPECIAL PREPARATION INSTRUCTIONS enclosed.
We can not be responsible for panels’ not sticking due to improper door
preparation!
3. NOTE:
You have been provided with a small abrasive pad and a TAPE TEST STRIP
to check adhesion before mounting.
Once you have cleaned the area properly, try sticking a test tape to the
area in several places. If the tape sticks readily proceed to the
next step. If the tape does not re-clean until it does.
DO NOT ATTEMPT TO INSTALL YOUR DOOR GUARDS UNTIL YOUR TEST STRIPS ADHERE PROPERLY.
4.
Apply a strip of masking tape along the door panel above the contour to
protect it. Lightly scuff the door panel along the entire perimeter to
be mounted and wipe off any and all shavings. This step will produce a
raw surface. Once this is done swipe the entire perimeter with the
adhesive promoter (provided). Allow a few seconds to dry.
5.
Before you remove the red liner for permanent attachment place the door
guard into position and check the fit. Your panel comes to you preformed
however it will be necessary to form by hand to insure a nice perfectly
contoured fit. When you are holding the panel up to the door it should
lay flat and conform to the shape of the door without forcing it. (In
other words it should look like it is installed and not be protruding
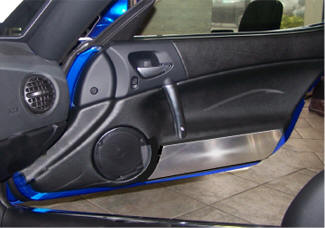
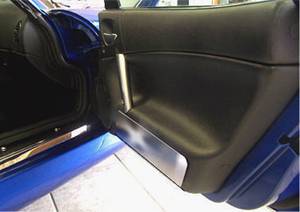
from the door panel in any way). Please refer to the pictures at the end
of these instructions. Make note of its position. NOTE: Be sure that the
points tuck into the door panel and do not protrude.
6.
Remove the red liner (be sure not to touch the adhesive) and carefully
reposition the door guard, press firmly all over the panel to set.
7. Remove protective liner. Then repeat steps 1-7 for the other door.
If any questions occur during installation please contact admin@TheViperStore.com
Maintenance: Care must be taken when cleaning your door guards. It is a good idea to lightly dust your door guards with a clean soft cloth first in order to prevent any particles from scratching them. Then wipe (using a new clean soft cloth) with a good quality streak free glass cleaner.
This is how your installed panels are designed to fit on your door panel.
TheViperStore.com
a HotCarAccessories.com website
13 copyright