'03 - '06 VIPER HEADER AND SIDE PIPE EXHAUST ASSEMBLY
INSTALLATION INSTRUCTIONS
HEADER INSTALLATION
1. Remove
spark plug wires & plug shields. Remove spark plugs & number them
according to their cylinder number to be reinstalled later into the same
cylinders to avoid misfire.
2.
Disconnect vacuum hose on brake booster.
3.
Disconnect throttle cable.
4. Disconnect positive battery lead on fuse/relay block.
NOTE: Positive cable is live - do not allow cable to touch metal. Wrapping the cable end with electrical tape during the installation process is recommended.
5. Remove
fuse/relay block mounting bracket and set it aside.
6. Remove
passenger side windshield wiper and wiper cowl.
7. Remove
cold air box below wiper cowl.
8. Remove
bolts on coolant reservoir and disconnect hose at heater core - set
coolant reservoir aside.
9. Remove
both exhaust manifold heat shields.
10. Remove
driver and passenger side sills.
11.
Disconnect oxygen sensors from both exhaust manifolds.
12. Remove
exhaust manifolds and head pipes.
13. Carefully clean any remaining exhaust manifold gasket material from heads.
NOTE: HEADS ARE MADE OF ALUMINUM AND WILL SCORE EASILY.
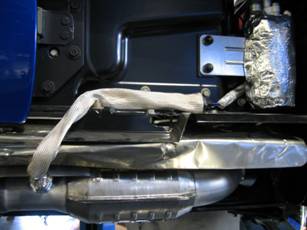 Rear
O2sensor routing - same on both sides. (Passenger side shown
above)
Rear
O2sensor routing - same on both sides. (Passenger side shown
above)
PREPARING OXYGEN SENSOR WIRES FOR REROUTING:
IMPORTANT - This kit comes with oxygen
sensor harness
extensions.
Oxygen sensor wires are not to be cut and spliced to reach new oxygen
sensor positions.
If these wires are cut and lengthened, it will result in faulty
calculations and “CHECK ENGINE” lights.
14. Prior to
installation of headers, it will be necessary to reroute the rear oxygen
sensor harnesses:
-Unclip rear oxygen sensor harnesses and plug in the supplied oxygen
sensor harness extensions.
These harnesses will then need to be rerouted to reach oxygen sensor position behind the catalytic converters. See photo.
These oxygen sensor harnesses need to be zip tied away from the headers and exhaust to avoid melting and chafing of the wires.
15. Headers
come in 3 pieces on each side. Take headers apart at the 2 bolt flanges
and use a wire brush to clean any corrosion from the coating that may
have seeped in during coating.
These surfaces need to be perfectly smooth to ensure an airtight seal.
16. There
are 3 slotted holes on the bottom of header plates for ease of
installation.
17. Install
header gaskets with 3 header bolts, lock washers and flat washers in the
bottom 3 holes matching the slots in the header plate on both sides.
18. Hang top
halves of headers (both sides) on header bolts already holding gaskets
to heads. Install header bolts and washers and finger tighten. Do not
torque these bolts yet.
19. Install
bottom half of headers on both sides using oxygen sensor-safe high temp
silicon and hardware provided. These flanges are laser cut and
machined flat - do not use gaskets.
20. Finish torqueing header bolts to heads.
21. Header bolts should be re-torqued after 1,000 miles to avoid bolts
loosening. This process need only be done one time after installation.
22. Reinstall oxygen sensors into new location on headers.
23. Reinstall steps # 1 through # 8 on front page under “Header
Installation” in reverse order.
** NOTE: Do not weld the stock front hanger bracket to Belanger’s header hookup (90º elbow with flange). The stock bracket setup is for use with the stock OEM flex pipe only.
Your Viper
has adjustable, slotted motor mounts. In some cases it may be necessary
to adjust motor mounts to center header collector in hole.
NOTE: WRAPPING HEADERS WITH HEAT WRAP WILL DESTROY THE TUBING & THE COATING!
EXHAUST INSTALLATION
To eliminate
the stock crossover tailpipe assembly:
1. Removal
of aluminum belly pan is necessary when eliminating stock crossover
tailpipes.
2. Remove
stock crossover tailpipe assembly.
3. Install
side exhaust with oxygen sensor-safe high temp silicon on header 3 bolt
flange with the hardware provided.
4. Install
tailpipe into slip fit at rear end of the muffler.
5. Install and slightly tighten band clamps to allow for fine adjustment and centering of tips.
NOTES: The tailpipe is a bolt on setup
with a stainless steel band clamp - this system works well, but I
recommend putting about ½ “ to 3/4 “ weld from the tailpipe to the
muffler,
along with the band clamp to prevent the tailpipe from rotating in the
muffler.
The tailpipe
section is designed to fit perfectly so that the stainless tip will sit
just forward of the center of the outlet hole (see picture below). On
some Vipers this tailpipe section
might be slightly too long - better to cut a little off to fit than to
have to add length.
Exhaust will
grow in length up to 3/8" after it heats up. Therefore, it is necessary
to position exhaust tip just forward of center to allow for proper
clearance.
See figure below:
WRONG WAY Front of car → CORRECT

6. Temporarily install side sills in order to center and align tips in
side sill outlet.
7. Remove side sill and tighten band clamps.
8. Reinstall side sills.
This product, in conjunction with your Viper’s computer, requires at
least 500 miles to recalibrate for air/fuel, timing and other critical
settings to “dial in” properly. Running your
Viper on a dynamometer (dyno) during this critical
re-calibration time will result in poor “dyno” numbers and your Viper
motor running hot. This action voids the product warranty
and the A.E.C. coating warranty on our product.
THESE PRODUCTS ARE FOR OFF-ROAD OR TRACK USE ONLY